> ## Documentation Index
> Fetch the complete documentation index at: https://docs-d0.donutbrowser.ai/llms.txt
> Use this file to discover all available pages before exploring further.
# Run a Strategy: Position Management
> Before D0 trades for you, you set the size and the daily limit. Entries, exits, and stops are the strategy's.
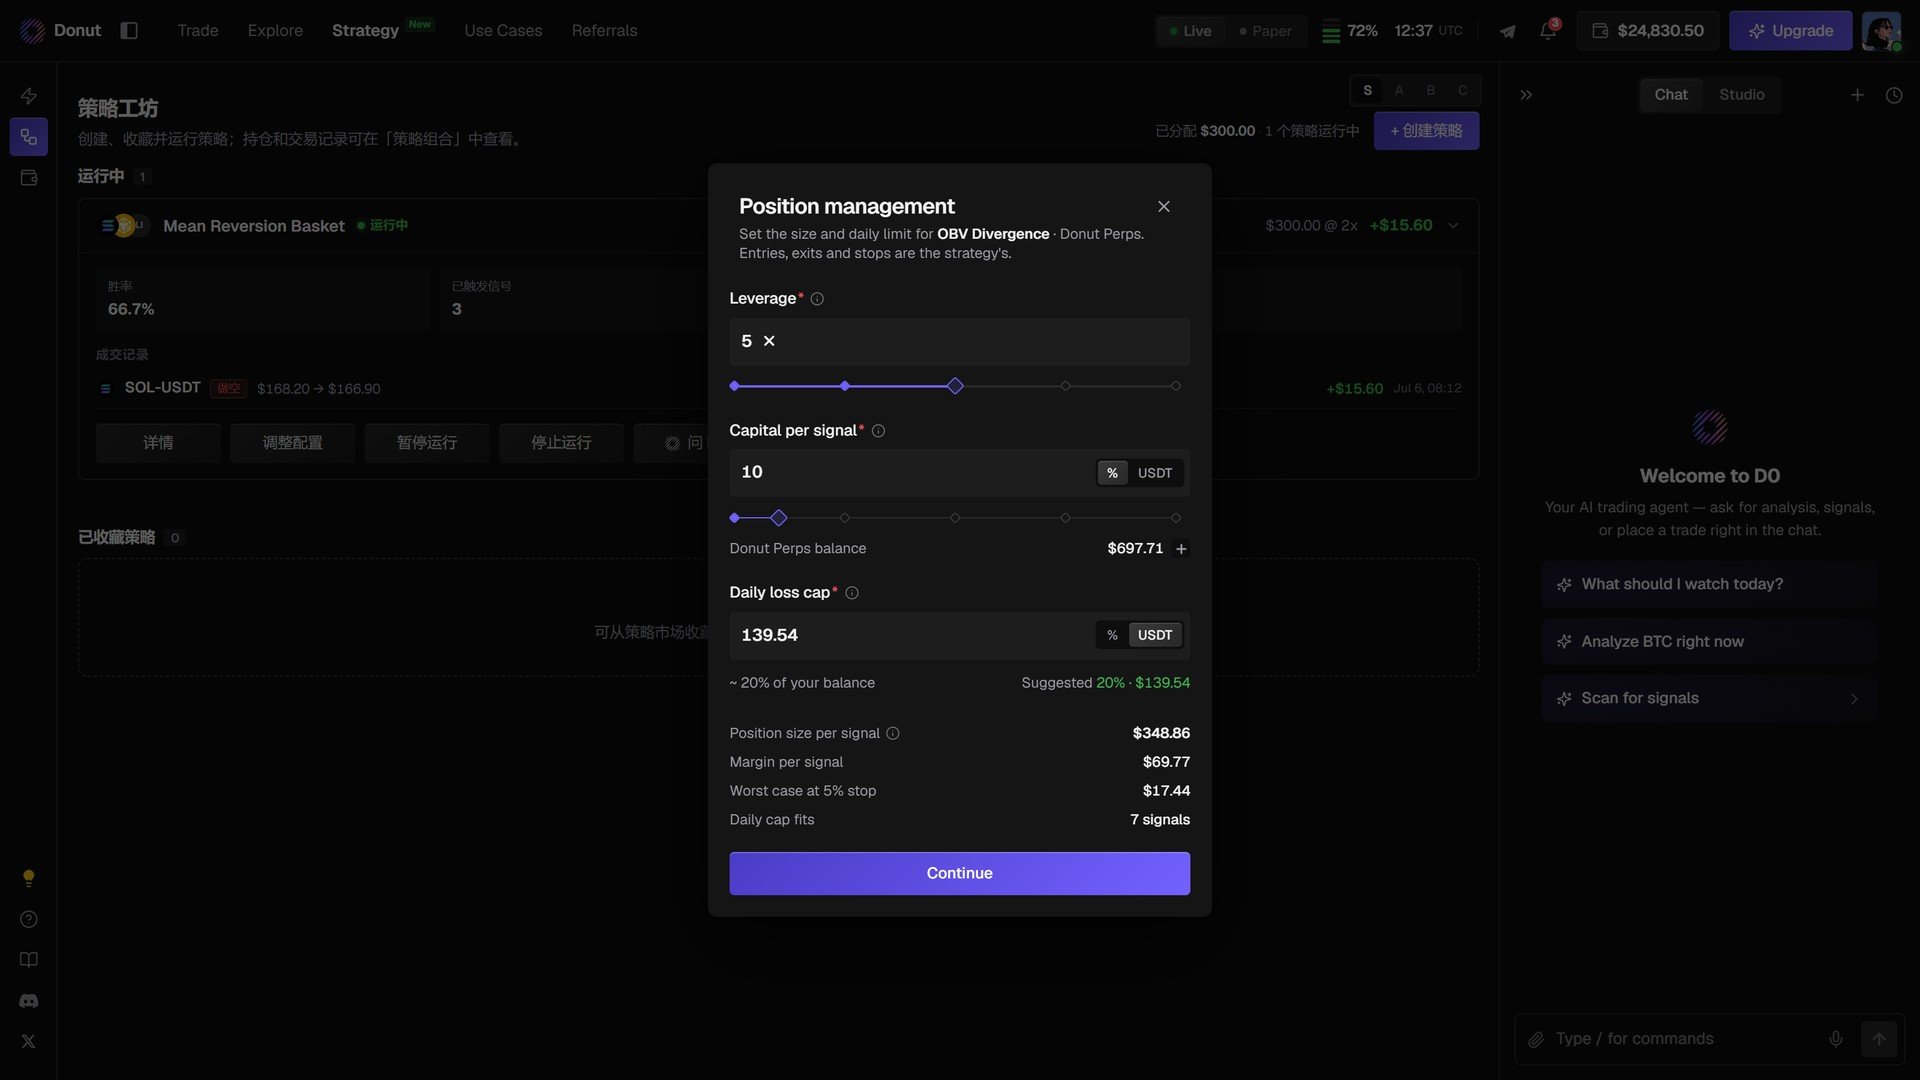
Click **Run strategy** on any strategy and the **Position management** modal opens: *Set the size and daily limit for this strategy. Entries, exits and stops are the strategy's.* D0 will not enable the strategy without it.
 ## The three settings
| Field | What it does |
| - | - |
| **Leverage** | A slider. It multiplies how much your margin controls in the market. Put in \$1,000 of margin at 10x and you control \$10,000 of position. Your upside scales up, and so does your downside. |
| **Capital per signal** | What percentage of your balance (or how many USDT) D0 uses each time a signal fires. With \$697 on Donut Perps and 10%, each signal deploys about \$70 of margin. |
| **Daily loss cap** | The most you are willing to lose in a day, in USDT or as a percentage of your balance. **Required.** The modal suggests a starting point, 20% of your balance, and shows the dollar figure. |
The venue balance the strategy trades from (**Donut Perps balance**) is shown between the fields. If it is empty, deposit first.
## The four computed values
As you change the settings, D0 recalculates:
* **Position size per signal**: margin × leverage.
* **Margin per signal**: what each signal takes from your balance.
* **Worst case at 5% stop**: what one signal loses if the stop is hit.
* **Daily cap fits**: how many losing signals fit under the daily cap before the strategy stops for the day.
Click **Continue** to enable. The strategy card shows it running, and the signals it fires appear in the deck and in **Activity** as they execute.
## Stopping
Open the strategy again and stop it. Stopping pauses new signals; positions already open stay open until you close them from the positions table.
## Tips
**The daily loss cap is required.** Start at the suggested 20% and tighten once you have seen the strategy run.
**Leverage amplifies both gains and losses.** At 10x, a 5% adverse move wipes the full margin of that signal. The **Worst case at 5% stop** line shows what that means in dollars.
**Paper first for low-quality scores.** The same modal appears for **Paper Trade**, with the paper balance instead.
## What's next
* [Strategy Library](/strategies/strategy-library)
* [Automated Trading](/features/automated-trading): the backend constraints that apply to every automated order
* [Risk Controls](/features/risk-controls)
This documentation is built and hosted on [Mintlify](https://mintlify.com), a developer documentation platform.
## The three settings
| Field | What it does |
| - | - |
| **Leverage** | A slider. It multiplies how much your margin controls in the market. Put in \$1,000 of margin at 10x and you control \$10,000 of position. Your upside scales up, and so does your downside. |
| **Capital per signal** | What percentage of your balance (or how many USDT) D0 uses each time a signal fires. With \$697 on Donut Perps and 10%, each signal deploys about \$70 of margin. |
| **Daily loss cap** | The most you are willing to lose in a day, in USDT or as a percentage of your balance. **Required.** The modal suggests a starting point, 20% of your balance, and shows the dollar figure. |
The venue balance the strategy trades from (**Donut Perps balance**) is shown between the fields. If it is empty, deposit first.
## The four computed values
As you change the settings, D0 recalculates:
* **Position size per signal**: margin × leverage.
* **Margin per signal**: what each signal takes from your balance.
* **Worst case at 5% stop**: what one signal loses if the stop is hit.
* **Daily cap fits**: how many losing signals fit under the daily cap before the strategy stops for the day.
Click **Continue** to enable. The strategy card shows it running, and the signals it fires appear in the deck and in **Activity** as they execute.
## Stopping
Open the strategy again and stop it. Stopping pauses new signals; positions already open stay open until you close them from the positions table.
## Tips
**The daily loss cap is required.** Start at the suggested 20% and tighten once you have seen the strategy run.
**Leverage amplifies both gains and losses.** At 10x, a 5% adverse move wipes the full margin of that signal. The **Worst case at 5% stop** line shows what that means in dollars.
**Paper first for low-quality scores.** The same modal appears for **Paper Trade**, with the paper balance instead.
## What's next
* [Strategy Library](/strategies/strategy-library)
* [Automated Trading](/features/automated-trading): the backend constraints that apply to every automated order
* [Risk Controls](/features/risk-controls)
This documentation is built and hosted on [Mintlify](https://mintlify.com), a developer documentation platform.